 Another day another dinner…honestly that’s sometimes how I feel. Luckily, on those days I have a wonderful guy to pick up the slack and who can whip something yummy up from the dredges of our fridge and small pantry. Other times, I have planned dinner out to a “T” for the whole week and get annoyed when he uses something up, that (in my mind) I had dibs on. It gets complicated…In the summer though, I get inspired by all the colorful produce and try to do as minimal cooking as possible – essentially leaving the veggies raw, enhancing them with some salt and pepper and fresh herbs. The veggies stay vibrant and presentation can be pretty spectacular without a ton of effort. It’s easier to do than you think, it keeps the kitchen cool (keeping the cook happy) and is super fast…you can make soups, salsas, salads, and pestos galore! I’d been hearing about green goddess dressings a lot recently - I can personally vouch for this one by Melissa Clark - and then a few weeks ago I saw a recipe for a red goddess salad dressing - which I have yet to try, but think looks pretty awesome – which got me to thinking about how my pestos are always green – delicious, but unfailingly green. So why not try a red one, I thought and why not make your first time doing it for your blog…so foolish of me. However, dressings and pestos are sort my thang, my niche, my comfort zone, so I forged ahead and thought the results were quite tasty. This recipe yields about a cup of pesto, more than you probably need for the dish, and if you don’t end up finishing it in a few days, you should freeze it. Then some day when you are spent and have no interest in cooking and are complaining that the fridge is empty anyways, your other (slightly more resourceful) half can pull it from the depths of the freezer and make something annoyingly impressive with it. 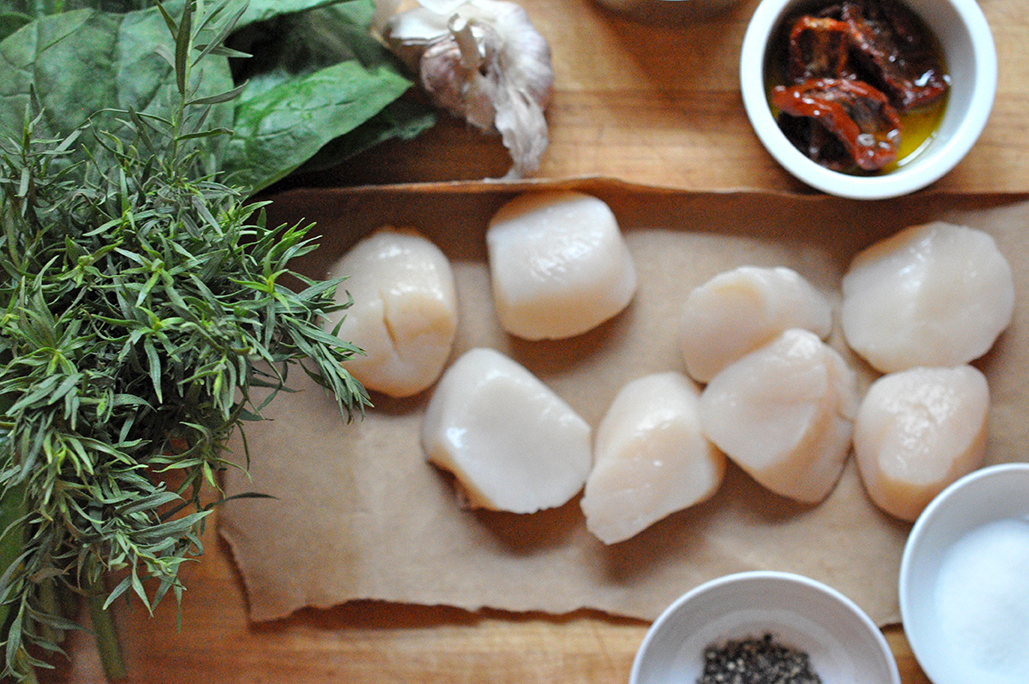 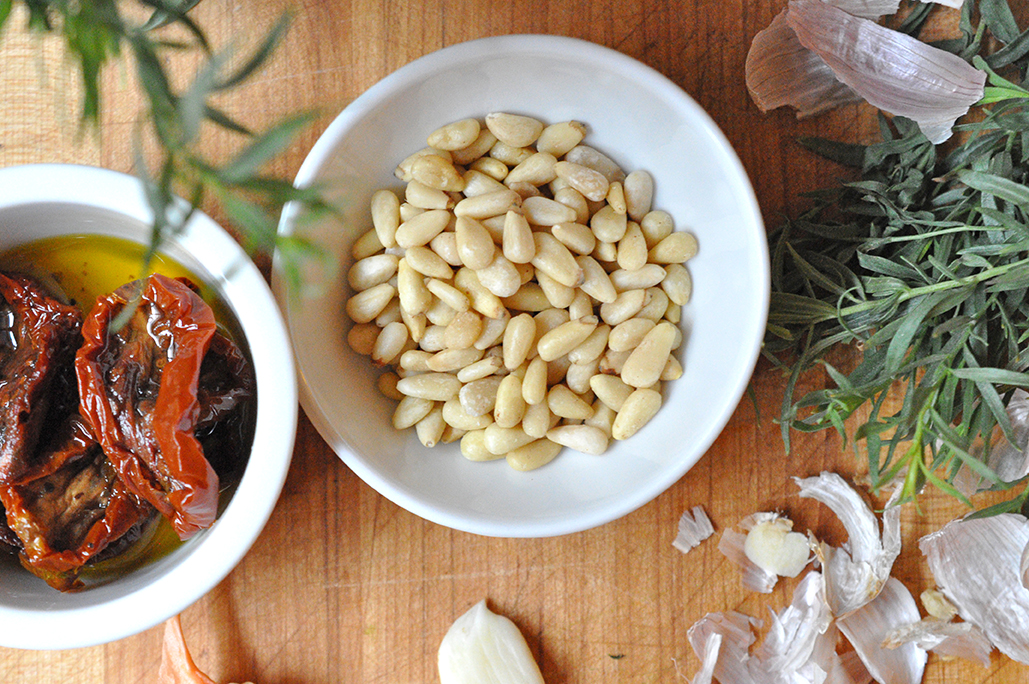
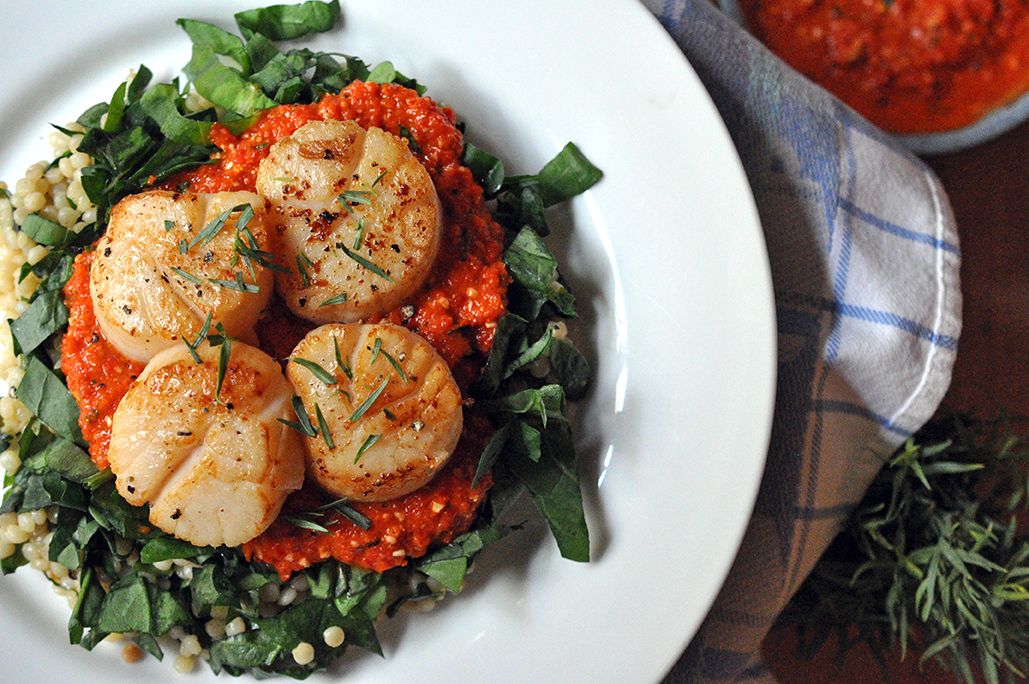
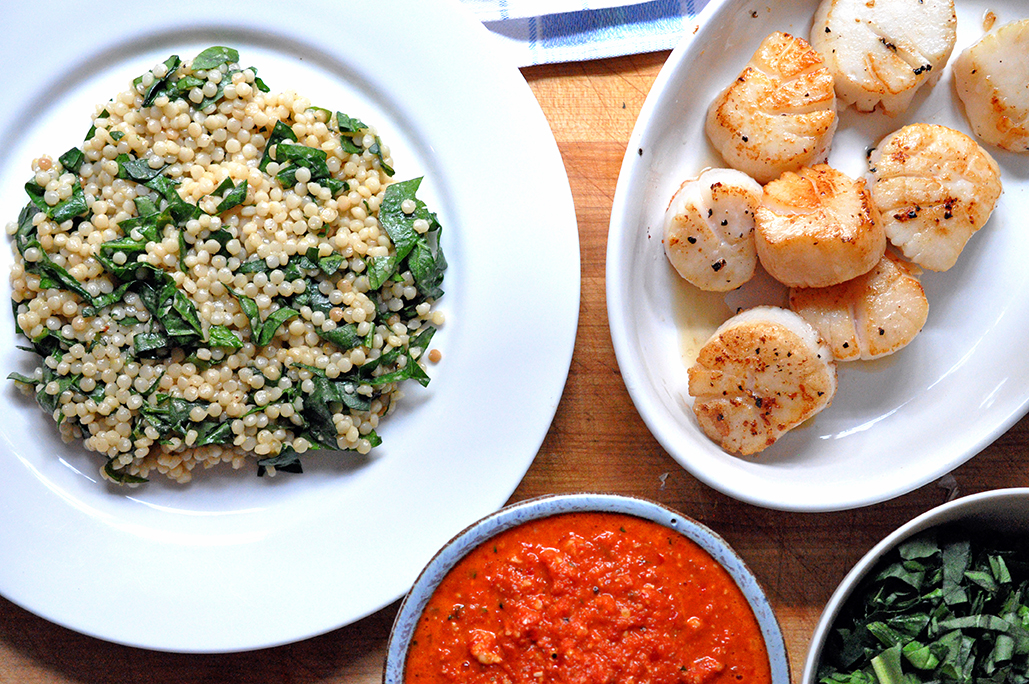 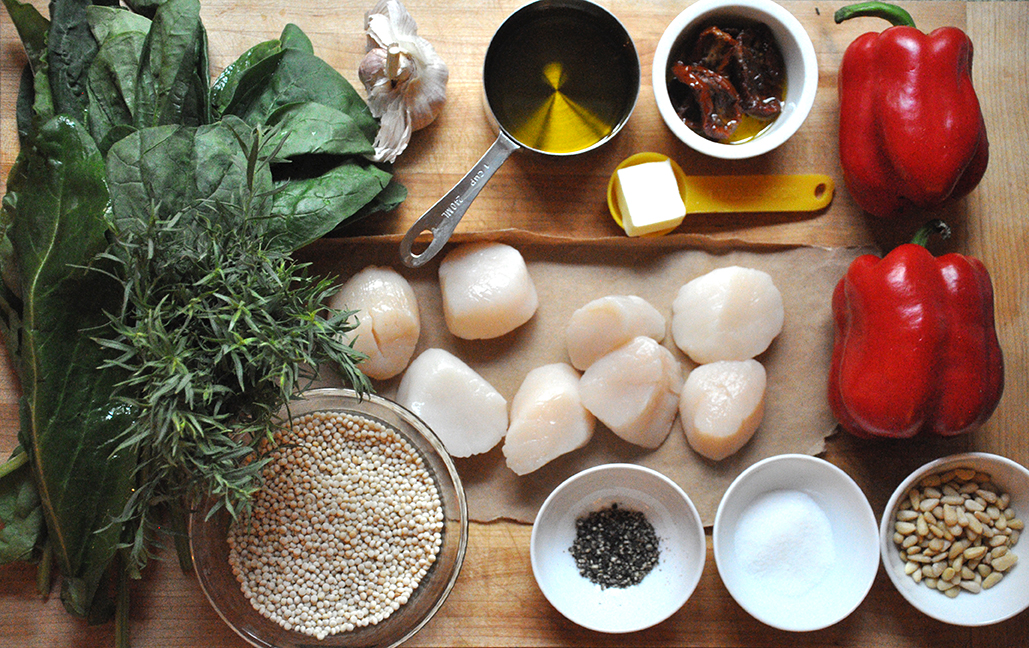 Red Pesto + Sea Scallops Salad PRINT [Prep: 15 mins / cook time: 25min / TOTAL: 40 mins] [Serving size: 2 dinner portions, 4 app portions]
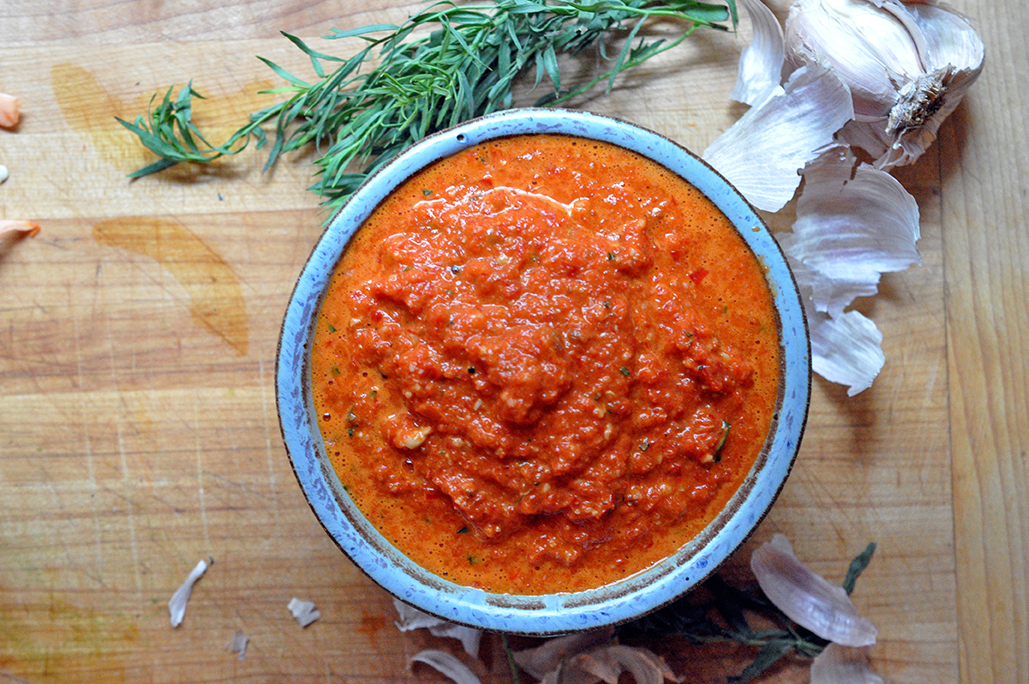
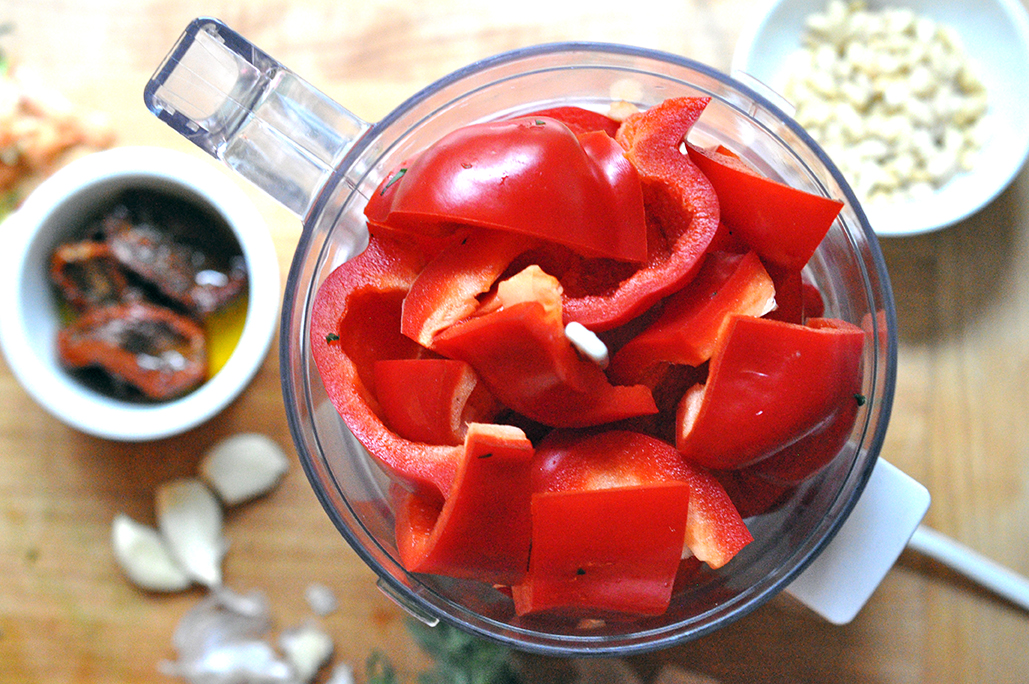
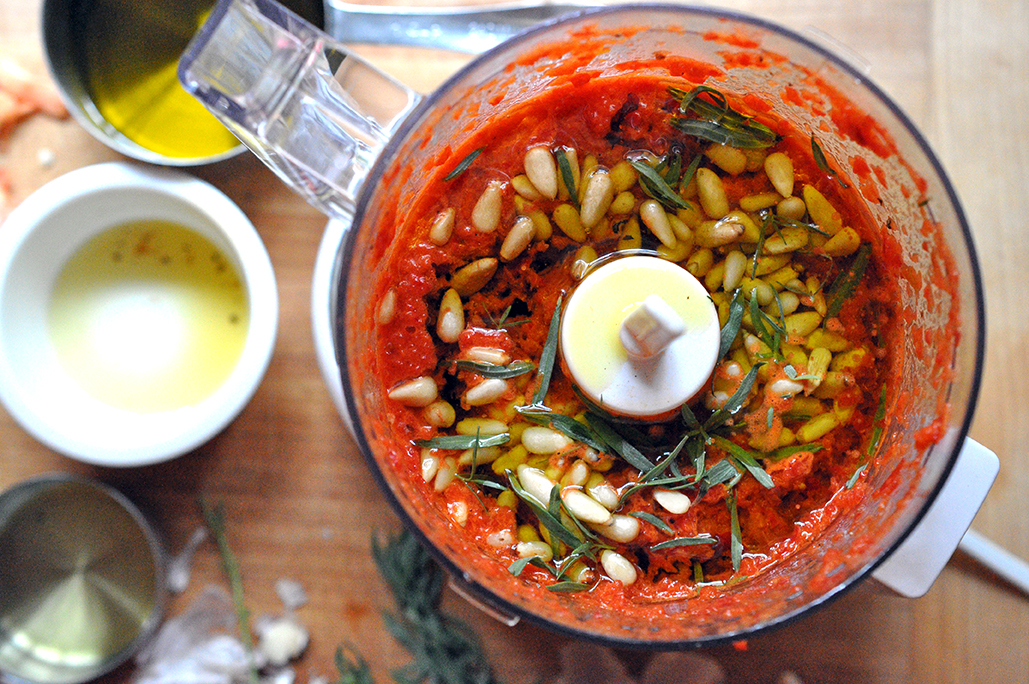
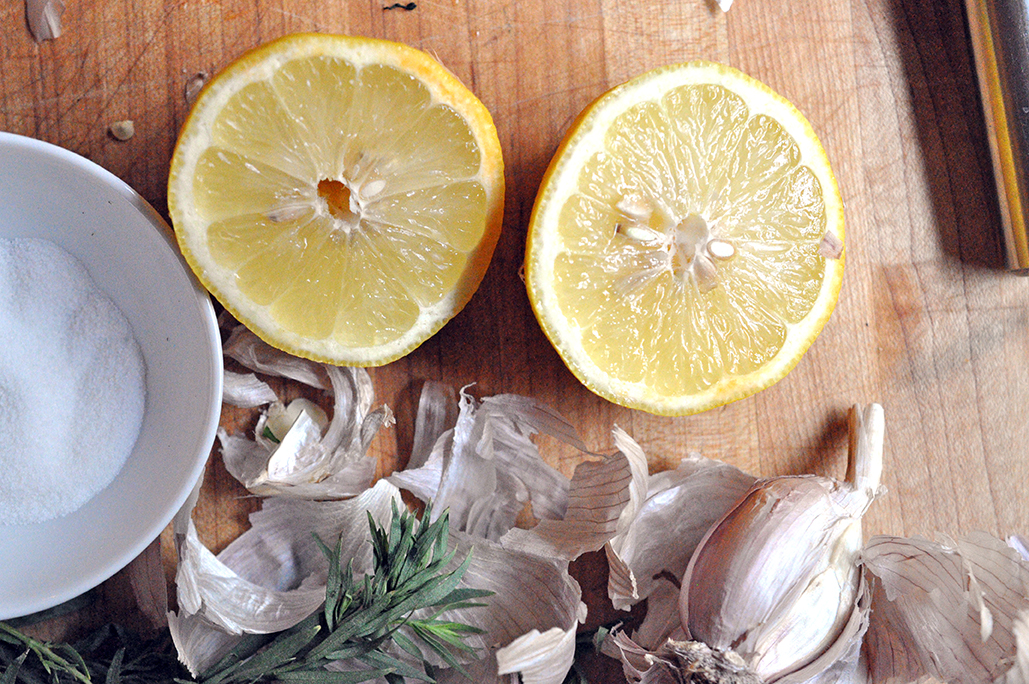
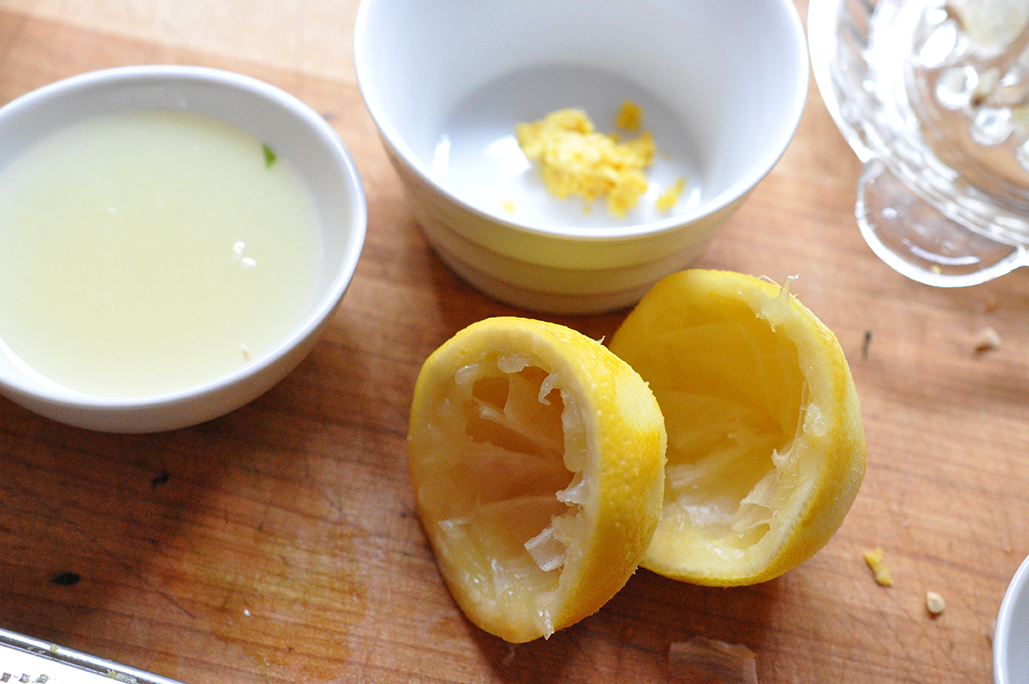
Toast the pearl couscous in a 3-quart [medium sized] pot with 1/2 tablespoon butter until slightly browned, about 3 minutes. Add1-1/4 cup water and a dash of salt. Bring to a boil over med-high heat then cover and let simmer for about 10 minutes. Wash and core red pepper. Add to blender/food processor along with sundried tomatoes, 1/4 cup olive oil, garlic, tarragon, pine nuts, a few grinds black pepper and 1/2 teaspoon salt. Blend until smooth and all ingredients are well incorporated. After washing the spinach and sorrel, cut both into thin ribbons. [Note: sorrel is more common in the spring and fall, it doesn't love the heat, so if this is hard for you to find this summer you should sub in any flavorful green you like...basil, arugula, curly endive...get creative, go crazy!] Zest and juice the lemon. Pat dry the scallops and season lightly with salt and pepper. Heat a large skillet over med-high heat and add 1/2 tablespoon butter and a 1 tablespoon olive oil. When the butter begins to foam and brown slightly add the scallops to the skillet, spacing them out generously. Let sit for 3-4 minutes until the underside is golden brown. Flip, cover and wait one minute more. Turn off the heat, remove the scallops from the skillet, add lemon juice to the skillet and step back – it will smoke a little – this will deglaze the pan and pick up all the flavor from the scallops. By now the pearl couscous should be finished cooking. Add 1 tablespoon olive oil, the drippings from the deglazed skillet and the lemon zest, a dash of salt, a few grinds black pepper and 1/2 of the greens and mix well. Plate each dish starting with the couscous, the greens, a generous layer of the red pesto and the scallops, garnish with a few leaves of tarragon and….Enjoy! 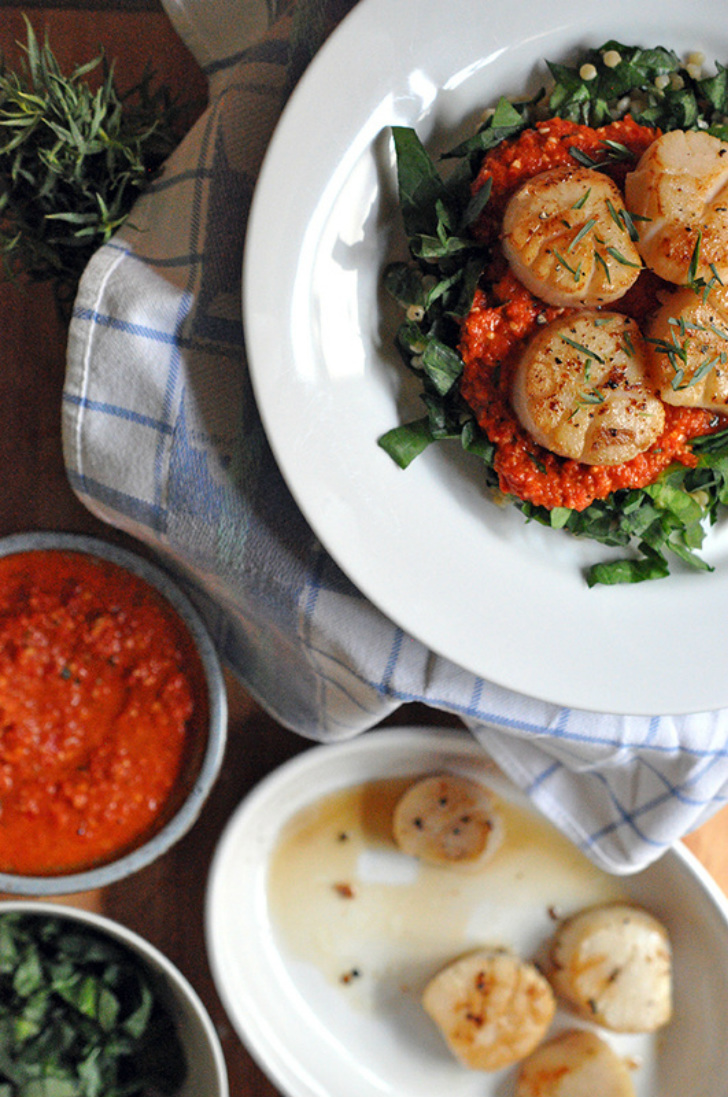
3 Comments
 Back when I lived in NYC about 2 ½ years ago…oh dear how time flies…I used to have Sunday night suppers with a close group of friends. One couple in particular would host, their place being the most appropriate, well at least bigger than the 475 square feet that I inhabited with my boyfriend. They also had a backyard, a sheer joy that most new Yorkers do not get to experience often. Anyways, we’d plan these yummy communal meals like pizza, roast pork loin, or Korean dumplings. We’d spend a few hours prepping, cooking and drinking wine…and eventually eating too – really, what else is there? Recently a lot of the cooking for these posts have taken place on Sunday and it’s finally, f i n a l l y, starting to cool down here in Texas. I was thinking of what to make when I remembered my last Sunday night supper – two weeks ago on a trip home visiting my family. I spent a weekend with this couple in Brooklyn and we made a risotto with collard greens. The wife – my culinary cohort of sorts – and I looked at the collard greens she had gotten in a CSA share, both a bit dumbfounded. Was I, the resident “southerner” or at least the closest one to it, supposed to know what to do with it? Um…let’s make a risotto, I said. And my friend, being the wonderful cook she is, already had nearly everything on hand to do so. So we wung it. Winged it. Whatever. We came up with a rocking risotto recipe with collard greens and red peppers. I decided to try it again, except this time I would beef it up with some bacon. While on my way to the grocery store I called my friend to let her know I was cooking a Sunday night supper of my own. She told me that she was as well; hers was to be spaghetti and meatballs. Oh yes, delicious, I said, thinking of the last time we had made it together, stuffing each meatball with a piece of mozzarella. Food embraces, it reminds, it can make friends over 1,500 miles apart feel close – in each other's kitchen with a glass of wine and wrists deep in ground chuck. 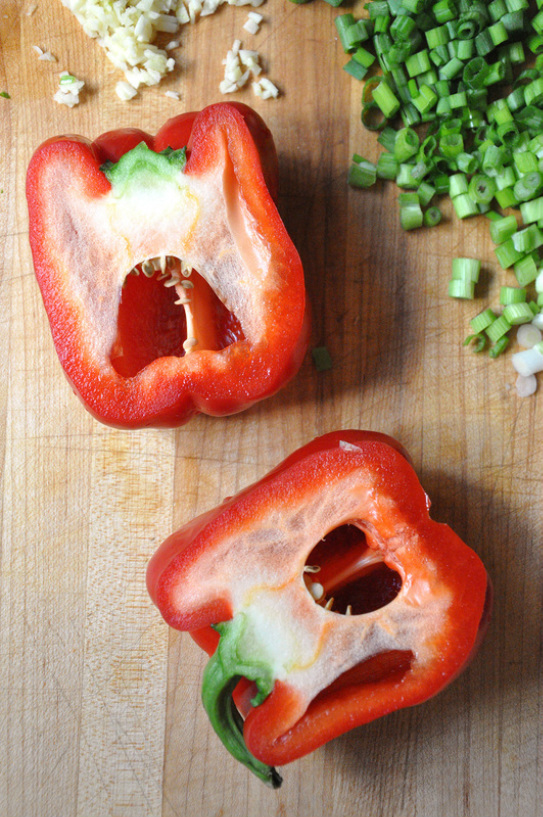 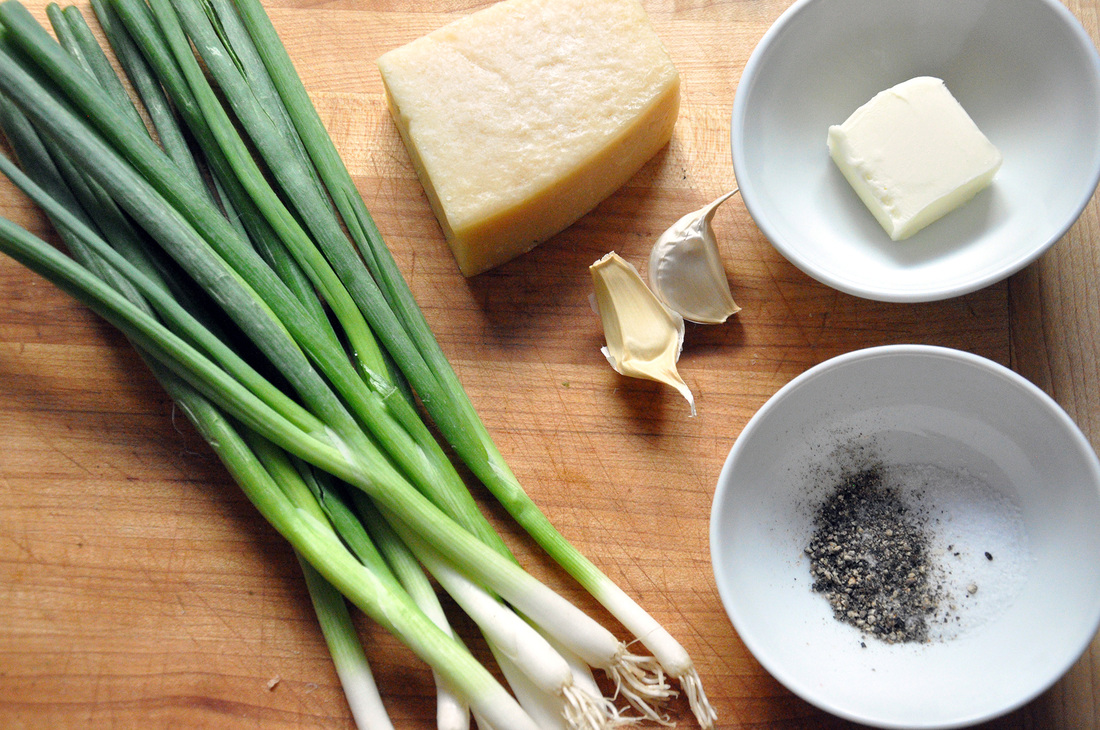
 Risotto with Collard Greens, Red Pepper and Bacon PRINT RECIPE [Prep: 30 minutes / Cook: 30 minutes / TOTAL: 60 minutes] [Serves 4 as main course]
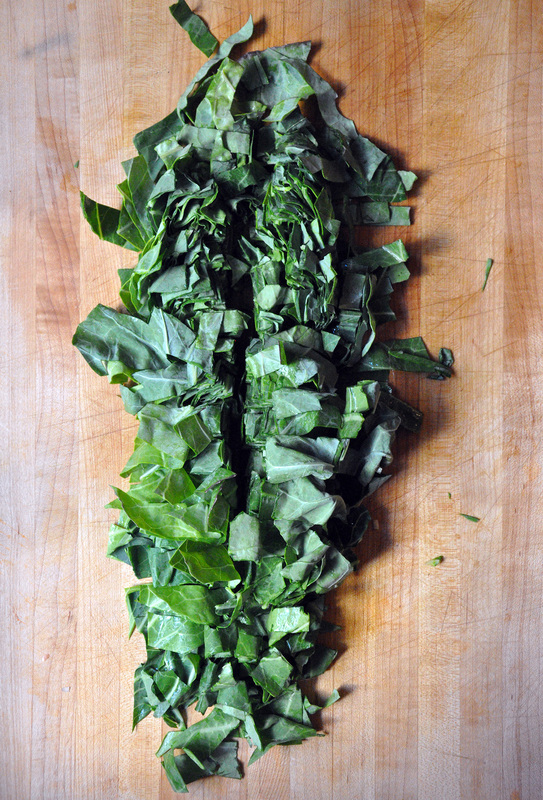
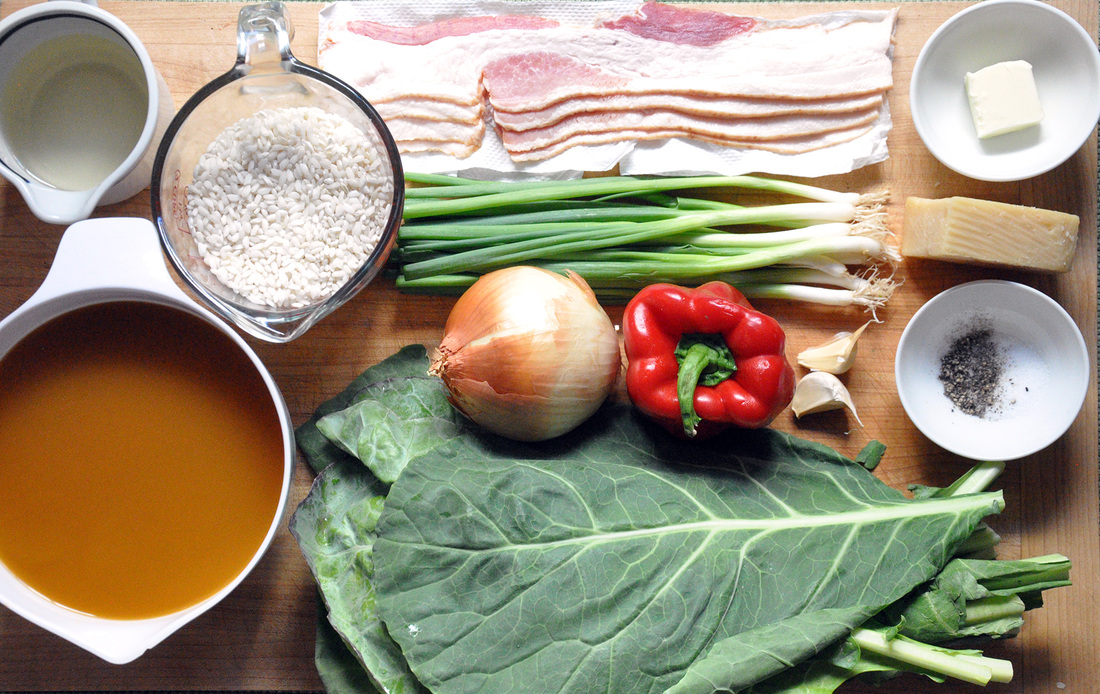
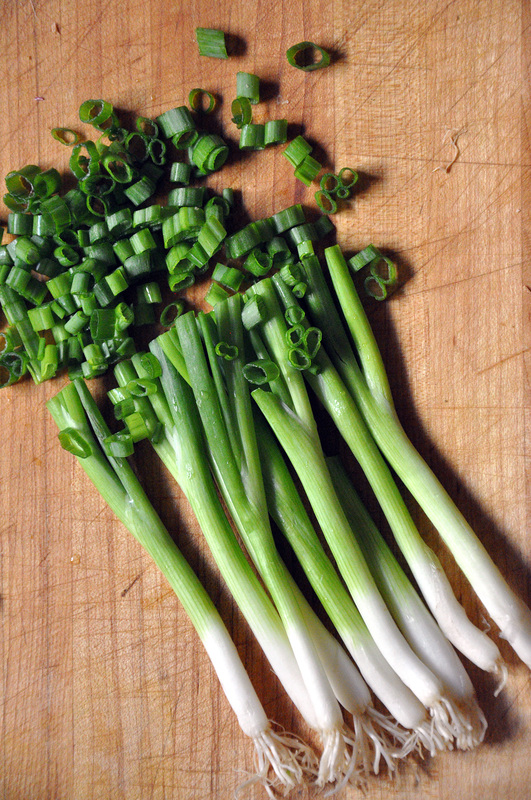
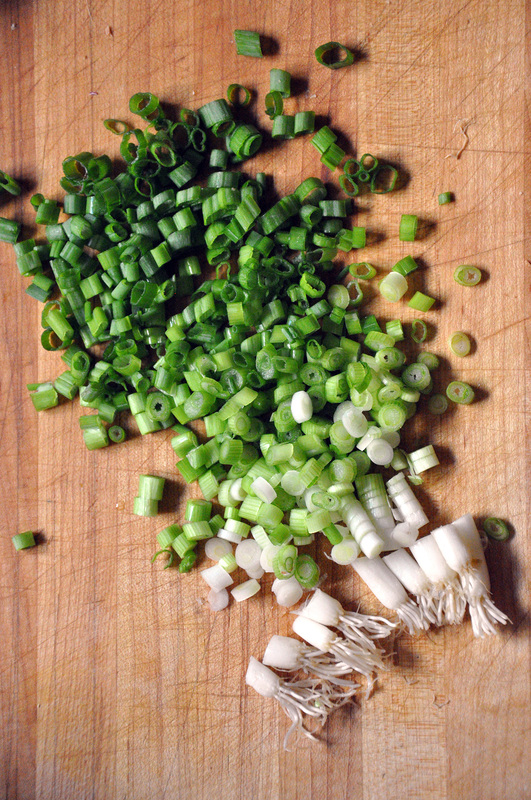
So here we go. If you’ve never made risotto do not fear, it’s really quite simple – it just takes a little looking after. It’s a common mistake to think that it takes a long time to make, actually once the prep is all done, it only takes 25-30 minutes! Before you get started with any chopping, pour 5 cups of low sodium broth into a medium sized saucepan. [If you have homemade broth – even better!] I use low sodium because I like to add the salt myself, then I actually now how much is in there. It’s always a good idea to taste the broth and to get a sense of the flavor and saltiness you are working with. Set this to medium-high heat and leave covered. You’ll want this to come to a boil by the time you’re done prepping. This hot broth will be added to the risotto in batches. You’ll also want to grab a larger saucepan, or even a pasta pot, fill it half way with water, put the heat on high and cover it. This is for blanching the collard greens. Take out a large prep bowl and fill it half way with ice – this will become the ice bath for the greens. Now you are all set to start with the chopping! There’s nothing fancy going on here – just try and have the onions and red peppers chopped to approximately the same size. A trick for chopping the onions [which can be used for the garlic as well] is to cut the onion lengthwise and then cut those pieces in half widthwise. Peel the outer layer of skin off; lay the onion down on its flat side so that the root end is on the cutting board, not sticking in the air. Then make long radial cuts all the way to the root leaving about a ¼ inch of the root intact. Then cut perpendicular to those slices all the way up the onion. Now you have perfect uniform chopped pieces. The scallions are easy too. After they’ve been washed, just trim about 2 inches of the greens off of the top and start chopping your way down to about ¼ inch from the white roots. Discard to the tops and roots. The collard greens are super easy to stem; you can use the same method that I’ve suggested for kale, slice the leaf along the stem nearly to the top on each side and pull it out. The collard green leaves are quite stiff and can even just be pulled off of the stem. I like to make a chiffonade of the greens by rolling all the leaves together lengthwise and chopping them cross wise into ribbons. I took this one step further by then making one long slice down the middle length of the roll. I don’t want the slivers of collard greens to be long and unruly in the risotto. By now both of the liquids on the stove top should be boiling. You can turn off the broth and leave it covered; it will stay hot for a while. Toss the collards greens into the boiling water in the pasta pot and add a dash of salt. The greens need to be blanched for 4 minutes. Now is a good time to fill the bowl of ice with cold water. While you are waiting on the greens, take a pair of kitchen scissors or shears and cut the slices of bacon into ½ inch pieces and put the saucepan you’ll be using for the risotto on medium heat. [The ideal saucepan has a wide base about, 10 inches across, and 3-4 inch high sides – so it’s wider than it is high.] Once the greens are done you can either empty the pot over a colander in the sink or transfer the collard greens directly from the pot to the ice bath with a slotted spoon. Let the greens sit while you add the bacon to the saucepan, they should sizzle once they hit the surface of the pan. At this heat it should take about 2 minutes for them to crisp up. Mix them up a few times so both sides are crisp. During this time you should remove the collard greens and spread them out to dry a little on a paper towel. Once the bacon is finished [nice and crispy] transfer them with the slotted spoon to a small plate covered by a paper towel. The bacon fat will be quite hot by now so you should turn the heat down to low. 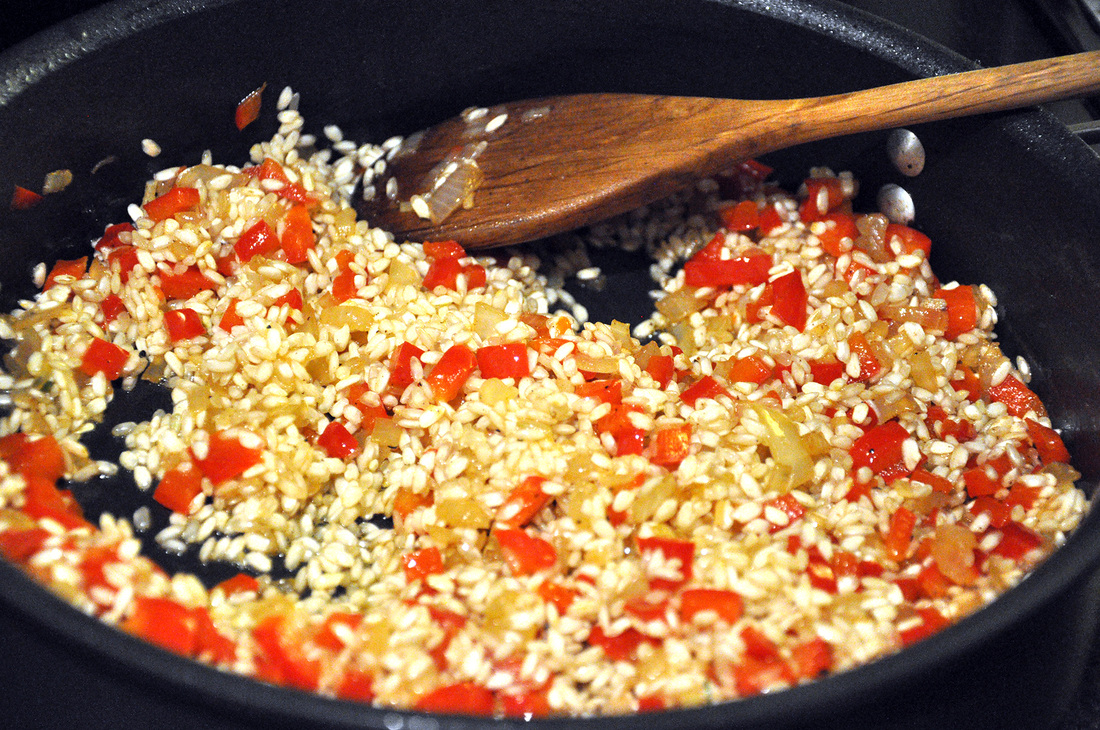 You are now ready to start the risotto! I would take this time to make sure that you have everything ready at hand. Are the wine and rice measured out? Do you have a ladle ready to use to transfer the broth? Is the cheese grated? After checking that all these steps have been taken the bacon fat should be cooled a little and ready to use. To it you should add 1 tablespoon of the butter, the chopped onion and a pinch of salt. Let this sauté, stirring a few times, for about 3 minutes. [I would re-adjust the heat to a medium-low temp.] Once the onions are slightly translucent add the garlic and let sauté for 1 minute, stirring a few times. Add the red pepper and let sauté 3 more minutes, again stirring a few times. [This base for the risotto should be quite fragrant and the kitchen should smell delicious.] Now it’s time to add the rice – mix it in well so that everything has a nice coat of the butter and bacon fat. Sauté the risotto for about 1 minute, stirring the whole time so the rice doesn’t stick to the bottom of the pan. Now add the wine and turn the heat to medium, give the ingredients a good stir and let sit for 1 minute. Ladle in 2 scoops of the broth, add the collard greens and another pinch of salt, and mix well. From this point the risotto shouldn’t take more than 20 minutes. You’ll want to add 2 more scoops of broth about every 3 minutes. Stir regularly. You’ll see when you aren’t stirring that the liquid rises to the top and bubbles. This is okay but you don’t want to let it sit for too long. You never want it to dry out or stick to the bottom. You’ll know it’s ready for more broth when you stir and pull the risotto mixture from the bottom of the pan and there’s no liquid. Over time you’ll recognize the signs. As the risotto cooks the Arborio rice start to plump up a little and the liquid will become creamy. After about 15 minutes you should taste the rice for salt and flavor. Careful – it will be very hot. It will still be al dente, which is to be expected, but how about salt? Even though the broth was low-sodium we did start out this risotto with bacon fat, so it may not need a lot of extra salt – also remember we will be adding some parmesan cheese, which adds it’s own unique salty flavor. It’s easier to add salt than take it out. It’s nice to serve a dish like this on a warmed plate; you can heat the oven to 250 and put the plates in there for about 8 minutes. Keep tasting the risotto for doneness. There should still be a slight bite to the rice, but it shouldn’t be chewy. It will be absorbing the liquid less quickly. At about 20 minutes it may be ready for the last step. You should be nearly done with the broth by this time, maybe 1-2 ladleful’s left – transfer this to the risotto, as well as 2/3rds of the bacon, the ½ cup of parmesan cheese, 1 tablespoon of butter, and a few grinds of black pepper. Mix well; turn off the heat, cover, and let sit for 2 minutes. While you are waiting, finely chop up the rest of the bacon into small bits. Your risotto is finished! It should be creamy and even a little runny. Serve it on the warmed plate [not a bowl] so that it can spread out. Top it off with the chopped scallions, bacon bits, and some fresh ground pepper. Don’t forget the white wine…and enjoy. 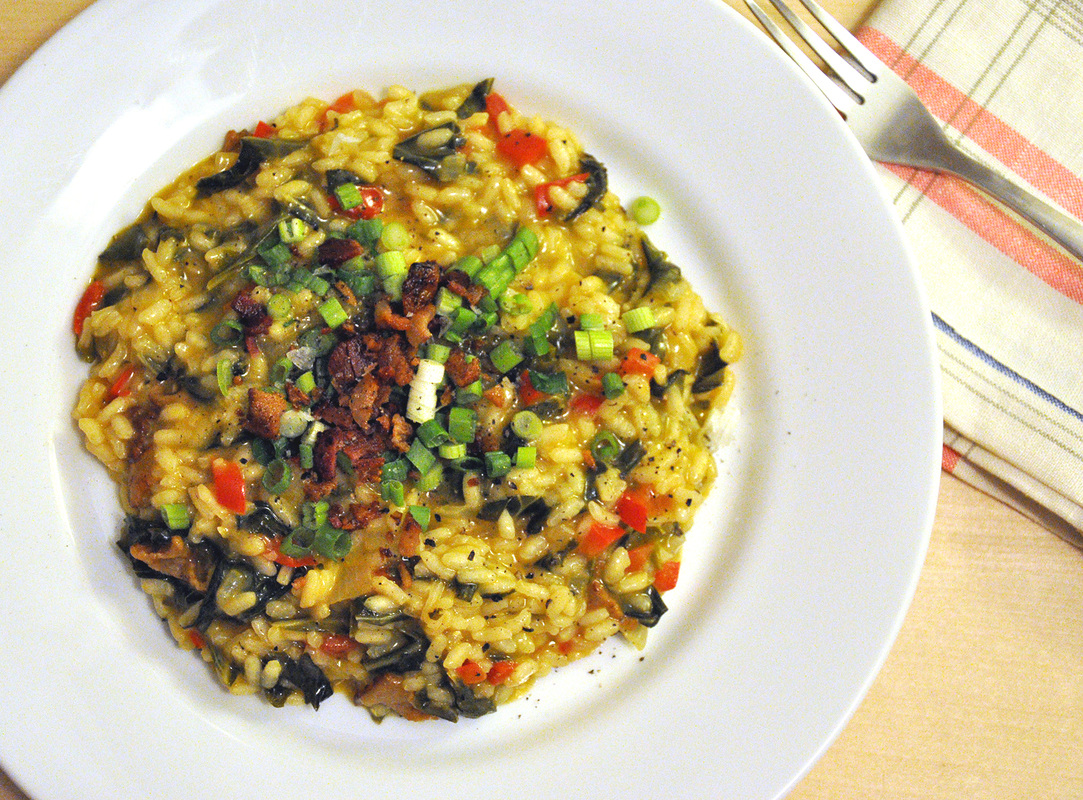 |
All
Stuff I follow...
Not Without Salt
My New Roots Sprouted Kitchen Thug Kitchen Lady and Pups A CUP OF JO The Daily Meal Melissa Clark ...always 3191 Miles Apart The Sartorialist Garance Dore The Nourished Kitchen Archives
October 2014
|


 RSS Feed